 Click Availability to update availability, absences, or substitute operator processing. You can identify a single substitute operator, or a decision rule that computes a substitute operator.
Traditional User portal basics — Using the Process Work workspace |
The Process Work workspace is available to operators associated with the traditional ('fixed') portals WorkManager and WorkUser, and is where users update or resolve work items in an application.
For new development, the composite Worker and Manager portals make it easier to provide a more effective and pleasing user experience. See About Composite Portals.
Note: In most Pega 7 Platform installations, you can experiment with the PegaSample sample application to create and resolve work items to understand this workspace. This approach avoids any possible interference with application test data or real production data. See Sample application.
In the WorkUser portal, the Process Work workspace fills the right side of the screen on login.
In the WorkManager portal, click the Process Work bar to access the Process Work workspace. Use the controls in the home view (described below) to select a work pool, find work, enter work, or access your worklist.
As you use the links and controls on the home view, additional forms or displays appear in the workspace.
Click the home button to return to the home view.
Depending on the settings in the user portal rule's Spaces tab, the portal may display, near the Pega logo, a drop-down menu where the user can select a work pool to work with.
If the user only has access to a single work pool, the drop-down menu does not need to be displayed.
If you have access to more than one work pool, the current work pool name determines which work types appear in the New... dialog box.
The choice of work pool name does not restrict the types of assignments you can see or process on your worklist.
Work pool names appear on this work pool selector list in the order that the corresponding work pools are listed on the Work Pools array on the Layout tab of the access group. If the list is long, consider reordering the Work Pools array to present the applications alphabetically, or in another order meaningful to users.
To create a new work item, select a work type from the New drop-down list on the navigation panel. This list displays all the work types in the current application. If the work type you want to enter does not appear, select a different application name.
Select a work type from the list. The entry form for that work type appears in the workspace.
Use the Find area of the navigation panel to search for and access an existing work item or assignment:
By default, the Get Most Urgent button is linked to a standard activity named Work-.GetNextWork, which calls the standard activity Work-.GetNextWorkObject, part of the Process API. Your application can override the standard activity, or use other Process API calls to set parameters for the standard activity. See Maximizing user productivity with GetNextWork.
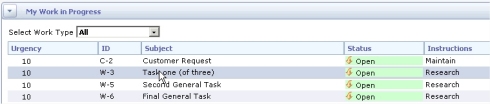
This area contains the top portion of your worklist. Each row of the worklist identifies one assignment routed to you.
You can interact with the worklist in five ways:
Click.. |
To.. |
| A row |
Access the user form and begin processing the assignment. |
| Where-am-I? icon |
See a flow diagram and the location of the current assignment in that flow. |
| (Preview) |
If your worklist display supports assignment preview, hold the mouse pointer over a work item ID. A pop-up preview of the assignment may appear. (This capability is available only when the optional Smart Info Settings values are configured on the Format tab of the list view rule that supports worklist display.) |
| Expand.. |
View additional assignments. |
| Expand and select a Work Type |
Limit the display to assignments arising from a single work type. This is useful when a worklist contains many assignments. Select |
Columns of the worklist identify aspects of the assignment:
Heading |
Description |
| Urgency |
A calculated value between 1 (lowest) and 100 (highest) identifying the priority of this assignment (property Work-.pyUrgencyWork). Rows are sorted by decreasing urgency value. A yellow clock icon displays after the goal time occurs. This indicator becomes a red clock icon after the deadline occurs. |
| ID |
The unique identifier assigned by the application to this work item. A prefix or suffix portion of this identifier can help users remember the application or work type. |
| Subject |
A brief text description of the entire work item, entered when the work item was entered (from property @baseclass.pyLabel). |
| Status |
The status of the work item (property Work-.pyStatusWork). |
| Instructions |
A brief characterization of the assignment, the value of the Assign-.pyInstructions property. Usually, this text is set in the Assignment Properties panel of the assignment when editing the flow. As a best practice, choose instruction text that starts with an imperative verb and conveys to the application user the goal or intent of completing the assignment. Instruction text that starts with the word |
| Work Type |
A label for this type of work item, selected when you or someone entered the object. (The system derives these labels from the Short Description field of the class rule for this work type.) This field does not appear in the expanded worklist display. |
The My Group area is available to work managers to review current assignments. You can examine the worklists of each user in your work group, and the contents of each workbasket associated with your work group.
Select a name from the View List for combo box to list the assignments on that operator's worklist. The list contains all operators in the work group.
Select a workbasket from the View Queue for combo box to list the assignments in that workbasket. This list includes those workbaskets for which the Work Group field matches the Work Group field in your own Operator ID instance.
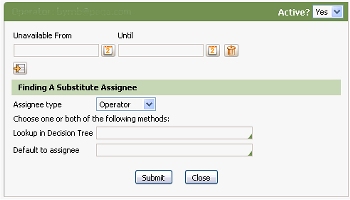
You can mark a user as unavailable, record scheduled absences, and change their skill profile.
Click Availability to update availability, absences, or substitute operator processing. You can identify a single substitute operator, or a decision rule that computes a substitute operator. Operators who are unavailable can still sign on, enter work, and process assignments. They can receive assignments through transfers, but not through routing.
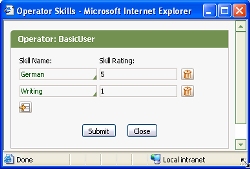 Click the Skills button to review or revise the application skill profile. Routing activities may match assignments to users based on this information.
Click the Manage Workbasket link to access the Data-Admin-WorkBasket data instances that define workbaskets associated with your work group.
This list includes those workbaskets for which the Work Group field matches the Work Group field in your own Operator ID instance.
The My Process Actions area is available only to work managers. Use this area to apply an action to all the assignments on a worklist or workbasket. This function is known as bulk processing.
For example, you can transfer assignments from one operator (within your group) to another, from one workbasket to another, or apply a flow action repeatedly to all the assignments on a worklist.
See WorkManager portal basics — Processing assignments in bulk.
This area allows you to search for work items (in the currently selected application) based on work item status and one other criterion. In contrast to the Search for Work queries in the navigation panel, this query lets you search by attributes (property values) such as work item status, customer name, and so on.
This facility identifies properties by the Short Description. If the Short Description that appears is not meaningful to the application user, in most cases, you can override the property with another, choosing a more appropriate description. In most cases, choose a work type or work pool for the Applies To class of the new property.
You can search by any top-level property that is an exposed column in the database table holding the objects in the work pool. A database administrator can, in most cases, expose additional (non-aggregate) properties by changing the database schema, after which they appear here. When appropriate, a database administrator can create database indexes to further speed searches on specific fields, such as account numbers, telephone numbers, or other heavily used properties. See PDN article Create a database index to improve performance of searches for background on this feature.
Your application can customize the columns and appearance of the worklist by copying and modifying a gadget or a list view report.
The standard portals WorkUser and WorkManager reference, on the Tabs tab of the Portal rule form, a standard gadget named WorklistExpandContract. By default, this gadget is linked to the standard list view rule Assign-Worklist.Worklist.ALL, which defines the columns of the default worklist.
Use any of these approaches to customize the worklist display:

|
application profile, exposed property, sample application, work item status, transfer, urgency, worklist, work pool name, work type |