The toolbar at the top right of rule instance or data instance form headers contains a row of buttons and menus that perform tasks for the current record. The buttons that are available depend upon the type of record , or its locked status.
The top left form header contains
All forms have the Actions menu and Close button available. Depending on the form state and record type, an action is presented as follows:
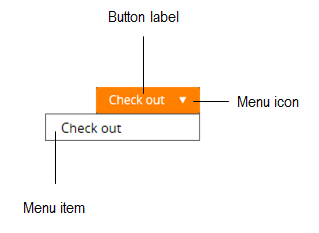
- A standalone button – click the button label to initiate the action.
- A button/menu combination – click the button label or make a selection using the menu icon to initiate the action.
- A menu item – select the item name from the menu to initiate the action.
Independent of its position or presentation, an action’s functionality remains the same. Use the following categories as guidance when determining which action is most appropriate for your scenario.
Option |
Record type |
Results |
|
Save |
Rule or Data |
Save the current edits on the form to the PegaRULES database. Saved edits persist after closing and reopening the form. Enabled only when you can save. |
|
|
Rule or Data |
Opens the Save As form. Use when you want to copy a record. This button is visible to developers who hold the privilege @baseclass.ToolbarFull or @baseclass.ToolbarSaveAs. See Completing the Save As form. Note: As a best practice when creating classes and properties, create a new record rather than Save As or Copy, because some fields on the Class and Property forms cannot be altered after you save the form. |
|
Save As >Specialize by class or ruleset |
Rule |
Opens the Specialization form. Use when you want to move a rule to a different ruleset or class in your application layer. |
| Save >Specialize by > circumstance | Rule |
Opens the Specialization form. Use when you want to create a circumstanced version of a rule using the time-qualified fields, properties and/or templates. Opens the Create Specialized Version form. Create a circumstanced version of a rule that uses a property value. This action is available for base or non-circumstanced versions of rules. See Completing the Specialization form and About Circumstance Template rules. |
|
Rule |
For a checked-out rule in your personal ruleset, copies the modified instance over the original instance in the public RuleSet. See check in. Also releases the lock so other operators may use the Check out action. Enter a comment that briefly describes your modifications. If your application is enabled for Project Management tracking and a communication link is active between an instance of the Project Management Framework, select a PMF item and enter a comment. Private edit check in For a privately checked-out rule (see Private Edit below) in your personal ruleset, opens the Check In Rule dialog so that you can copy the modified instance to a specified unlocked destination. If the destination is the ruleset from which the rule was originally checked out, the modified instance replaces the original instance in the public ruleset. Check into a branch If you check into a branch and the branch ruleset does not exist, the system automatically creates the branch ruleset. |
|
|
Check Out |
Rule |
Creates a copy of a rule in your personal RuleSet. No one else can check out a rule while it is checked out. The Check Out button appears when all of the following conditions are true:
See check out. Other operators can use Check out to branch or Private Edit until you release the lock. A locked rule displays a padlock Checkout is not possible for a few rule types, such as class rules. |
|
> Check out to branch
|
Rule |
Available for an application that has branches. Opens the Check Out to Branch dialog , which allows you to save a copy of the rule into a branch RuleSet and check out that record. In the Check Out to Branch dialog, select the branch into which you want to save the rule and click Check Out to Branch. The system:
The Check-out-to-branch menu option appears when all of the conditions for Check Out are true and there is a branch defined in the current application. If you subsequently discard the checked-out rule, the copy of the original (source) rule created by the system in the branch ruleset remains in the branch ruleset. Check out to branch is not possible for a few rule types, such as class rules. |
|
Check out to branch |
Rule |
Appears on a record that is locked by another user or is in a locked RuleSet and there is a branch RuleSet defined in the application. See description for Check Out > Check out to branch. A locked rule displays a padlock |
|
Rule or Data |
Deletes a rule or data instance. See Delete toolbar operation. |
|
|
Rule |
Deletes a checked-out rule from your personal ruleset. The original, unchecked-out rule is not affected. See Delete toolbar operation. |
|
|
Rule |
Creates a copy of a rule in your personal ruleset. Displayed when the following conditions are true:
Similar to a standard check out, a private edit is not possible for a few rule types, such as class rules. See check out. A locked record displays a padlock Use the Check In button to check in your copy. |
|
|
Restore |
Rule History |
Performs either of two actions, depending on the context:
This button is visible to developers who hold the privilege @baseclass.ToolbarFull. |
|
Rule |
Delegates a record using the My Favorites facility. This menu is visible to developers who hold the privilege @baseclass.ToolbarFull. See Delegating a rule using favorites and favorite. |
|
| Actions > Delegate | Rule | Delegates a record (data table, decision table, or paragraph) to a user. Unlike favorites, only the latest version of a rule can be delegated. See Delegating a rule or data type. |
|
|
Rule or Data |
Creates a new rule or data instance of the type currently open. See Completing the Create form. This menu is visible to developers who hold the privilege @baseclass.ToolbarFull or @baseclass.ToolbarNew. |
|
Actions > Create > rule category > rule type
|
Rule or Data |
Creates a new rule or data instance by selecting a rule type or data class from a list of rule or data type class categories. See Completing the Create form. This menu is visible to developers who hold the privilege @baseclass.ToolbarFull or @baseclass.ToolbarNew. |
| Actions > Open flow image |
Flow |
Opens the process flow shown on the Diagram tab of the flow rule as an image file (Rule-File-Binary). As graphical changes are saved to the flow the image file is automatically updated. After you open the image,you can download it as a separate file for sharing or printing. When a flow rule is first created, whether from the case designer or manually, it does not yet have an associated image file. Therefore, the Open flow image menu option will not be available until a graphical change is saved to the flow which then creates the image file. |
|
Rule |
Splits the workspace to present a partial preview of the runtime appearance of a rule in the bottom half of the workspace. You can preview harnesses, sections, controls, activities, flow actions, HTML rules, edit input rules, edit validate rules, properties ( Caution: Using the Preview function for a harness, section, flow action, activity, or HTML rule creates a clipboard page and initializes properties on that page. In turn, the initialized properties may start declarative processing. Accordingly, use caution before implementing any on-change declarative processing that updates a database. |
|
|
Rule |
Starts execution or testing of the current rule, in the current context. See How to unit tests a rule with the Run Rule feature. This menu is visible to developers who hold the privilege @baseclass.ToolbarFull or @baseclass.ToolbarRun. |
|
| Actions > Trace | Activity or Data Transform |
Activates Tracer to help you analyze and debug the activity or data transform's behavior. |
|
|
Rule or Data |
Accesses a topic in this help system relevant to the currently displayed rule or data form. |
|
Actions > View versions |
Rule |
Display the versions of the rule, their availability, and their circumstance. Click an item to open the rule form. Not available on rules that are not versioned such as applications, classes, and RuleSets. |
|
Actions > View references |
Rule or Data |
Choose the menu item to access a list of other rules that reference the current open rule, and other rules that the current rules reference. See Referencing Rules display. This menu is visible to developers who hold the privilege @baseclass.ToolbarFull. See Using the Related Rules menu. |
|
Actions > View siblings |
Rule or Data |
View the results of a complete search for siblings to this rule. See Finding understand sibling rules. |
|
Rule or Data |
Shows the XML document that makes up the form displaying this instance. This is primarily a debugging aid. Use to identify the property names (and the handle) for each property referenced in the form. This menu is visible to developers who hold the privilege @baseclass.ToolbarFull. Note: If you have modified and saved the rule or data form, this information may be out of date. To see updated information, close the form, open the same rule or data object again, and select View XML again. |
|
|
Rule |
After a rule is saved, presents in a new window an approximation of the generated Java to be created by this rule instance. You cannot alter this Java code. This menu appears for developers who hold the privilege @baseclass.ToolbarFull. Available for activities, when condition rules, and stream rules, among others. See Pega 7 for Java developers. |
 next to the